I was reading an article the other day about the fact that historically, artists learned by apprenticing and studying with the masters. Later, there were studios where you could study one-on-one with fine artists and teachers to learn your craft and improve your skills. While private lessons today can be quite expensive, there are options open to us to take classes with experienced teachers. These classes can be small groups that meet once a week or on some other sort of schedule or they can be a more intensive workshop that lasts for just a few days, but involves painting for 8 hours each day. In the decorative art world, the classes are taught much as they would have been at the feet of the masters. Techniques are demonstrated and then practiced on a project. Everyone in the room is painting the same project, but no two finished pieces are ever alike.
This weekend, I traveled to Buffalo, NY, to take a 2-day workshop with Connie Parkinson. Connie is an oil and acrylic painter. Her workshops are generally in acrylics. She had adapted techniques that are traditionally used with oil paints so that they can be used with acrylic paints. It was a wonderful workshop. I can't wait to do some of my own designs using the techniques that I learned from her. Each day was an 8-hour painting session and we completed one painting a day. Here is the Saturday project. It was painted on a 9x12 piece of gesso board.
Monday, April 30, 2007
Thursday, April 26, 2007
Red Hat Birthday
Every year on April 25, the Red hat Society celebrates its birthday. And so, to all my Red Hat sisters (yes, I am that old), I wish you a Happy Red Hat Day!
Wednesday, April 25, 2007
Memory Box
Today I painted a Memory Box. Many artists participate in Memory Box programs. We paint a papier mache box with any design we desire. The designs are typically florals or things like teddy bears or animals. When the boxes are finished, they are donated to hospitals where they are given to parents of infants who are still born or die shortly after birth. It is a wonderful program and the boxes are very much in demand. This box is part of the Buffalo Snowbirds program. I am going to Buffalo this weekend to take a workshop sponsored by the Snowbirds. In order to take the workshop as a member, you must have paid your dues and painted an item for one of the service projects. This box is about 10" in diameter. Notice that the strawberries and leaves fall over the the top of the box on to the sides. The box is painted to look like a bentwood Shaker box.
Tuesday, April 24, 2007
A Make-It-Take-It
A little more of my Retreat report. While watching over the Make-It-Take-It table, I was able to take one of the project classes during a slow time. One of the teachers specializes in painting on fabrics. Her MITI was butterflies on an insulated canvas lunch bag. The paint is DecoArt So-Soft iridescent colors with permanent black ink outlining.
Monday, April 23, 2007
Trying Something New
I have just gotten home from a 4-day painting retreat. Unfortunately, I was a member of the retreat committee, so I did not get to do a lot of painting. I did have an opportunity to teach two 4-hour classes in Genesis and two 2-hour make-it-take-it classes. I like going to retreats and conventions. They provide an opportunity to gather with friends and acquaintances who share your interests. You can share ideas and a really good time. But retreats and conventions also provide an opportunity to try something new--a new technique, a new surface, or even a whole new medium. With a minimal investment, you can get a taste of something you haven't tried before and decide if you want to pursue it further.
Amidst all of the activity, I did make time to take one class. It was a class in chalk pastels. I have never used pastels, although I think pastel paintings can be quite lovely. I have read a few books and scribbled a little, but I was not happy with my results. Taking a 4-hour class with someone who knows what they are doing is a wonderful way to learn a little. I like pastels. I don't care for the mess--and they are messy. I have learned enough to know that I would like to work with them a bit more.
Here is my class piece--my very first pastel. The piece is painted on Mi-Tientes paper using Rembrandt soft pastels. The name of the piece is "Chloe". She is a ShihTzu and belongs to the instructor. I am quite proud of my first effort.
Tuesday, April 17, 2007
Chickadees
Thursday, April 12, 2007
A cool surface for painting
I was looking for an unusual surface to use for creating a Make-It-Take-It and I wanted to use Genesis Heat-Set oils to do the project. In a very old book, I saw a project that had been painted in oils on a piece of cork--the AH-HA moment!! I had some 6x6 cork tiles in my studio just waiting for inspiration to strike. One of the issues with Genesis is that whatever surface you use must be able to be heated to a temperature of 265-degrees and I was not sure about cork. The good news is that cork works very well. Because there is some texture on the surface, it is a little trickier to paint. On the other hand, if you choose the right subject, the texture enhances your painting. It is not necessary to do any preparation to the surface before painting. To give the piece a little more character, I rouged a little color on the corners and down the sides of the piece. Here is my Genesis MITI. I cut the 6x6 tile down to 3x6. When the piece was finished, I glued it to a 5x8 piece of black mat board. The piece can then be placed in a 5x8 frame for hanging. I hope the people at the retreat like this piece as much as I do. It will be a good introduction to Genesis.
Wednesday, April 11, 2007
Make-It-Take-Its
I have spent the past couple of days designing make-it-take-it projects. A MITI is a project that can be completed in 2 hours. Most decorative painting retreats include the opportunity for attendees to take these short classes. I believe that MITIs should be an opportunity for people to try new techniques, new mediums, new surfaces. The cost of these projects/classes is generally no more than $15, so you can try something you have not done before at a very low cost.
One of the projects I designed this week is painted on a plastic garden clog. Once finished, this clog can be used as a planter. In order to paint on this material, you need to rough it up with a little bit of fine sandpaper. Then clean it with rubbing alcohol and paint away. The acrylic paint adheres very well and you do not need to put any sort of top coat or varnish on it. In fact, it will probably hold up better without.
Sunday, April 8, 2007
Art takes many forms
Happy Easter or Passover to each of my readers.
I was pondering what to post today and I decided that I would talk about the fact that art takes many different forms. I am primarily a painter, but I do other artistic things as well. My friend Judi from Alaska is primarily a doll/fiber artist, but she does a lot of other things, too. Most of us participate in a number of different activities, many of which could be classified as artistic endeavors.
This summer we renovated our kitchen/breakfast room. It took all summer and well into the fall. While we had help doing to actual work, I did all of the design. I also did the faux finish on the breakfast room walls. Today, I finally finished the curtains and the window seat cushion for the breakfast room portion of the space. I made Roman Shades. I have never made them before, but I found a book that provided clear and complete instructions. I found fabric at a Calico Corners Outlet Store in Delaware during the summer. I just needed to make the time to do the work. We have been having snow in western Pennsylvania since Thursday, so this was the perfect time. Between yesterday and today, I made the two Roman Shades and the cushion for the window seat. I am very pleased with the results. Windy likes it, too. She is on "kitty patrol" and watching for squirrels and chipmunks that come into her yard as well.
Saturday, April 7, 2007
Quilt Block
If you have never tried painting on fabric. It is fun and with today's fabric paints, you can get wonderful results. Here is a quilt block painted on muslin. It is painted with DecoArt SoSoft fabric paints. These paints do not require any sort of heat setting and can be layered to achieve shading and highlighting for pretty detailed work. It dries in about 24 hours. Once dry, it is washable. I have used this paint on sweatshirts and have washed them many, many time with no loss of the painted design.
This block is part of a quilt painted by members of the Town and Country Decorative Painters and will be given away at the annual retreat in two weeks. It is a fund raiser to support the retreat.
Friday, April 6, 2007
Seaside Minaiture Art Show
I finally got my submissions mailed off to the Seaside Miniature Art Show in Nag Head, NC, today. I have been trying to decide what to submit. I finally came down to measuring the pieces that were possibilities and discovering that only two of them fit the size requirement. I had a couple of pieces I thought were 6x6 including the frame and they turned out to be 6.75x6.75 to the outside edge of the frame. That made them larger than 40 square inches and therefore they did not qualify. The lesson learned here is that I need to work smaller than the maximum allowed painting size in order to insure that the outside dimensions will fit within the requirement--especially in my watercolors.
Anyway, the two pieces that are now on their way to North Carolina are both painting of pears. The first is called A Pair of Pears and the second is called A Trio of Pears. Both titles are sort of plays on words. These paintings are both done in Genesis Heat-Set oils. The size of the screen images is approximately life-size. Assuming that these pieces are not eliminated for some reason, they will be on sale through the Seaside Art Gallery for $65.00 each. You can see the website for the gallery and the show at www.seasideart.com
Labels:
art for sale,
Genesis Heat-Set Oils,
miniatures,
shows
Thursday, April 5, 2007
Bunnies
In keeping with the Easter theme, here are a couple of bunnies. I served on the Board of Directors for a non-profit organization that served victims of abuse where I used to live. We relocated the offices for this organization and the lobby was to be used as a play area for children while they were in the building with their Mothers. When we moved in, the room was totally black and white and depressing. I donated paint and my time. The employees painted the walls and I came in and painted a mural that gave the room the look of a garden--but quite stylized and child-like. Included in the mural were two bunnies. One is peeking out from under a bush. The other is standing up in front of the counter looking up at the receptionist.
Wednesday, April 4, 2007
An Easter Egg
With Easter upon us, I was thinking about a project I did for a class a couple of years ago. I found some resin eggs that were designed with a peep hole like the old sugar eggs. DecoArt had just come out with a product called Liquid Beadz. This product consists of small beads suspended in a clear glue-like material. You apply it to a surface and it sticks. It is much easier than having to glue individual beads to a surface. This product comes in a variety of colors. Some are single colors, some are a mix of several colors, and they have a clear bead as well. My plan was to use the clear Liquid Beadz to make the resin eggs look like the old sugar eggs.
Like many a good idea, this one was not as easy as it appeared on the surface. The first step was to paint the egg. These resin eggs were the very devil to paint. They did not accept the paint well and it took three coats to get acceptable coverage. then I painted little daisies over the basecoat--that was the easy part. Finally, the Liquid Beadz were applied. It took two full jars of the Beadz to cover this little 4-inch egg. They were applied with a craft stick and because the surface was not flat, they slid all over the place. They had to be applied in several steps in order to cover the whole egg. When it was all finished, I put some nesting material and a tiny chick inside. As you can see from the photo, it does have the look of a sugared egg. The clear beads allow the design on the surface of the egg to show through. I think I also piped some texture medium around the opening when it was completed so that it looked like Royal Icing, but I do not have a picture of that step. The egg has disappeared.
This is an example of where your imagination can take you if you think out of the box. The Liquid Beadz product is still available and there is also a Fabric Beadz that you can use to embellish fabrics. These products work best as embellishments and on flat surfaces, but use your imagination and who knows what you can come up with.
Tuesday, April 3, 2007
Painting Signage
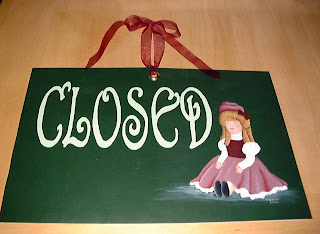
A couple of years ago, I was in an antique shop in Corning, NY. While I was talking to the owner about some silver plate spoons that I was buying to paint, she mentioned that she hated her Open/Closed sign and that she was looking for someone to make a different one for her. We talked about it for a bit and I got the job. He shop logo included antique toys and she mentioned how much she loved the doll. So, the doll became the centerpiece of the sign. Her logo was just a line drawing, so the colors were pretty much up to me. It is a little hard to see in the photos, but the doll is awake on the lighter Open side and her eyes are closed on the darker Closed side of the sign. The sign is painted on synthetic canvas called Kreative Kanvas. Each side was painted on a separate piece of the product and then the two sides were glued together. The tricky part was devising a way to hang the sign on her glass door. We opted for suction cups. The sign was a big success and is still in use.
Monday, April 2, 2007
Sweet Violets
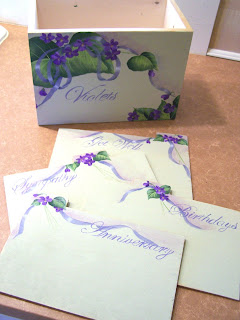
Here is another of the Virginia Beach Ros Stallcup projects. It is a file box for greeting cards. I have not attached the handle, yet. I need to varnish the piece before I do that. The handle is painted gold as is the top edge of the box and the edges of the dividers. This is a really useful piece and the violets are a delightful design. I have left the inside of the box unpainted. It will simply be varnished to protect the wood.
Sunday, April 1, 2007
Luscious Strawberries
Here is another of the Ros Stallcup projects from Virginia Beach. I love painting her fruits. The surfaces for this project are a black tin tray and a black tin pitcher. They are really nice surfaces to paint on. The source for these surfaces is Painters Paradise in Wilmington, DE. They carry a really good selection of tin/metal ware for painters. The nice thing about painting on these surfaces is that they require very little prep--just figure out your design or transfer your pattern and paint. On this day we also painted a strawberry pin using a puffy heart wood cut out.
Subscribe to:
Posts (Atom)